Tuesday, March 20, 2012

Blueberry Muffins (Gluten-Free)

This has been quite a week for posts!  Tonight I decided that I wanted to make muffins.  I'd been thinking about making them for a while, but I worried they wouldn't come out well.  I'm sort of picky about my muffins - they have to be perfect for me to want to eat them.


Preheat the oven to 375°F.


Line a 12-cup muffin pan with paper liners.


Melt butter/margarine (about 1 minute in the microwave).  Allow to cool until room temperature.


Combine sorghum flour, tapioca flour, and brown rice flour in a medium bowl.


Add sugar, baking powder, xanthan gum, and salt.  Stir until combined.


In a large bowl, whisk together butter, milk, eggs, lemon juice, and vanilla.  Gradually add dry ingredients until just combined.


Stir in blueberries.  The batter will be thick, but don't over-stir.


Spoon the batter into the muffin cups, filling each cup about 3/4 of the way full.


Bake for 10 minutes.  Rotate the pan and continue baking for about 10 minutes, or until the tops of the muffins are golden-brown and a toothpick inserted into the center of a muffin comes out dry.


Remove from the oven and cool in pan for 3 minutes.  Serve warm, or cool completely on a wire rack.


Enjoy!!  Store at room temperature.


Blueberry Muffins (Gluten-Free)
Adapted from Driscolls

Ingredients
2/3 cup sorghum flour
2/3 cup tapioca flour (also known as tapioca starch)
2/3 cup brown rice flour
3/4 cup granulated sugar
2 teaspoons baking powder
1 teaspoon xanthan gum
1/2 teaspoon salt
1/2 cup (1 stick) unsalted butter/margarine
1/2 cup milk
2 large eggs
1/8 teaspoon lemon juice
1 teaspoon vanilla extract
1 1/2 cups blueberries (fresh or frozen)

Instructions

1. Preheat oven to 375°F (191°C).


2. Line a 12-cup muffin pan with paper liners.


3. Melt butter/margarine and then let cool to room temperature.


4. Combine sorghum flour, tapioca flour, and brown rice flour in a medium bowl.  Add sugar, baking powder, xanthan gum, and salt.  Stir until combined.


5. Whisk together butter/margarine, milk, eggs, lemon juice, and vanilla extract in a large bowl.


6. Gradually add dry ingredients to large bowl, stirring until just combined (do not over-stir).


7. Add blueberries to batter.  The batter will be thick.


8. Divide batter into muffin cups, filling each about 3/4 of the way full.


9. Bake for 10 minutes.


10. Rotate pan and continue baking for 10 minutes or until muffins are golden brown and a toothpick inserted into the center of a muffin comes out dry.


11. Cool muffins in pan for 3 minutes.


12. Serve muffins warm, or transfer to a wire rack to cool completely.  Store at room temperature.

Hershey's Kisses Nail Design

Chocolate is basically always a good thing, and Hershey's Kisses are just so cute!  I decided I'd try devoting my nails to the wonderful candy this week.

Begin this design by applying a base coat to each nail, and then painting each nail brown (use 2 coats).


Use a silver striper to draw slightly rounded triangles for the Kisses.


Use a white striper to make the paper ribbon from the top of each Kiss.


Use a light blue striper to write "HERSHEY'S," putting one letter on each nail (it's only 9 characters, so I put a heart on one pinky).


That's it!  Super yummy nail design!

Monday, March 19, 2012

Sunny Day Nail Design

The weather was really nice this past week, and in honor of spring break I decided to do a sunny day nail design.  I didn't take pictures every step of the way, but I took pictures of individual nails and will provide instructions.  Leave a comment if you have any questions!

Start by applying a base coat to each nail.  Next, apply 2 coats of light blue nail polish to each nail.  Once that has dried, use a green nail polish to create grass at the bottom of each nail.  I used a green striper to give texture to the grass (the striper and the nail polish were different greens).  The rest is all just working off of that.

To create clouds, use the tip of a white striper to make dots that touch each other in different formations.  I made anywhere from 1-3 clouds on each nail.


For the sun, just take a yellow nail polish and make a dot using a medium-large dotting tool.  I did this on both of my pointer fingers.


To make the birds, use a black striper to create a V-shape that extends farther down than you would normally make a V.


For the tree, start by using a brown nail polish to make the trunk.  Next, use a green nail polish and a dotting tool to make green dots above the trunk.  You can make the tree as big or as small as you'd like.


For the flowers, start by making the stems with a green striper.  For the tulip, I used a lavender striper to make three lines (almost like a W-shape) and then rounded out the bottom.  For the other flowers, make a small dot a little bit above the stem.  Use another color polish to make 5 dots surrounding the center dot.


Apply a top coat and you're done!

Salted Caramel Chocolate Chip Cookie Bars (Gluten-Free)

When I saw a recipe for Salted Caramel Chocolate Chip Cookie Bars on Brown Eyed Baker, I knew I had to try to convert her recipe to be gluten free.  It wasn't too difficult, either (and they would have turned out even better had my oven not been turned off in the middle).  They were still super delicious (and very gooey), and everyone in my house was eating them!  Scroll to the bottom for the full recipe.


Preheat the oven to 325ºF.  Use vegetable oil or canola oil cooking spray to grease an 8" square baking pan (the one I used was glass).  Unwrap caramel candy squares and put them to the side.


In a microwaveable bowl, melt unsalted butter or margarine.  Leave the bowl to the side to allow it to cool to room temperature.


In a medium bowl, whisk together gluten-free flour, baking soda, salt, and xanthan gum.


In a separate, large bowl, use an electric mixer to mix the butter/margarine, sugar, and brown sugar on medium speed until combined.  Add the egg, egg yolk, and vanilla extract and mix until smooth.


Slowly add the dry ingredients and mix on low, until just combined.


Remove the bowl from the mixer and stir in the chocolate chips.


In a medium microwave-safe bowl, combine the caramels and heavy cream.  Microwave on high until the caramels are melted, stirring every 20 seconds.  This took me 2 minutes and 20 seconds, but times may vary.


Press half of the cookie dough into the greased pan, smoothing with the back of a spoon.  Pour the hot caramel over the layer of cookie dough and spread into an even layer.  Be sure to leave space around the edges to prevent it from burning.  Sprinkle the caramel with sea salt or kosher salt.  Drop the remaining cookie dough in spoonfuls and spread over the layer of caramel.  Sprinkle some more salt on top.


Bake the bars for about 30 minutes, or until the tops of the bars are golden brown and the edges start to pull away from the pan.  Cool the bars (in the pan) on a wire rack to room temperature, and then refrigerate for about 30 minutes to allow the caramel to set.  Cut into squares and serve at room temperature (should be stored at room temperature as well).


Salted Caramel Chocolate Chip Cookie Bars (Gluten-Free)
Adapted from Brown Eyed Baker


2 1/8 cups all-purpose gluten-free flour (I used King Arthur Flour)
1/2 teaspoon baking soda
1/2 teaspoon table salt
1/4 teaspoon xanthan gum
12 tablespoons unsalted butter or margarine
1 cup light brown sugar
½ cup granulated sugar
1 egg
1 egg yolk
2 teaspoons vanilla extract
2 cups chocolate chips
10 ounces (about 36) caramel candy squares
3 tablespoons heavy cream
Sea salt or kosher salt, for sprinkling over caramel and bars
1. Preheat oven to 325ºF (163ºC). Grease an 8-inch square pan with vegetable oil spray or canola oil spray; set aside.

2. Unwrap the caramel candy squares and set aside.

3. In a microwaveable bowl, melt the butter/margarine.  Set aside to allow it to cool to room temperature.

4. In a medium bowl, whisk together the flour, baking soda, salt, and xanthan gum; set aside.

5. Using an electric mixer, mix together the melted butter/margarine, sugar, and brown sugar on medium speed until combined.

6. Add the egg, egg yolk, and vanilla extract and mix until smooth.

7. Slowly add the dry ingredients and mix on low, just until combined. Stir in the chocolate chips.

8. In a medium microwave-safe bowl, combine the caramels and heavy cream. Microwave on high until the caramels are melted, stirring every 20 seconds. This will take about 2 minutes.

9. Press half of the cookie dough into the prepared pan, smoothing the top with the back of a spoon.

10. Pour the hot caramel over the dough cookie dough and spread into an even layer, leaving some empty space around the edges to prevent burning. Sprinkle the caramel with the sea salt.

11. Drop the remaining cookie dough in spoonfuls over the caramel and gently spread the dough with a spatula until the caramel is covered. Sprinkle the bars with additional sea salt.

12. Bake the cookie bars for 30 minutes, or until the top of the bars are light golden brown and the edges start to pull away from the pan.

13. Cool the bars on a wire rack to room temperature, then refrigerate for about 30 minutes to allow the caramel layer to set.

14. Cut into squares and serve. Store leftovers in an airtight container at room temperature.

Tuesday, March 6, 2012

Gluten-Free Pareve (Dairy-Free) Hamantaschen

Since this was my first Purim being gluten-free, I searched high and low to find a good recipe for hamantaschen.  They're so fun to make and so characteristic of Purim that even in the middle of midterms I made sure to make them!  My friend Sarah and I worked on these - and they came out great!  The full recipe appears at the bottom of this page.

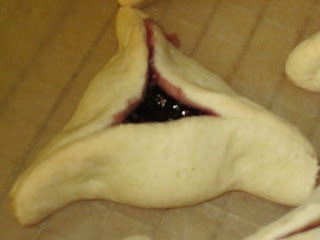
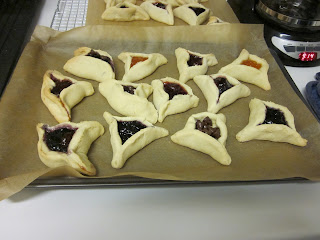
Here's how they come out - they don't even taste gluten-free!


This was my first time actually buying different gluten-free flours (I used Bob's Red Mill) and I have to say it was definitely worth it.  The dough came out really well and was easy to work with.  You could use whatever gluten-free flour mix you want, if you have a favorite or you find one in the store that looks good, but the combination I used worked very well.


In a medium bowl, combine gluten free flours, baking powder, xanthan gum, and salt.  Whisk to combine and set aside.


In a large bowl, use a mixer to beat eggs until thick.  Add sugar and beat for one more minute.  Add oil, lemon juice, and vanilla, and beat until combine.


Slowly add flour combination to the mixture.  Mix until well combined and dough begins to gather (dough may not be stiff enough to form a ball).


Remove dough from bowl, wrap in wax paper and then in plastic wrap, and refrigerate overnight.  The dough can be kept in the fridge for a few days before baking.


When you're ready to shape and bake the hamantaschen, preheat the oven to 350°F.  Work with a quarter of the dough at a time, and keep the rest of the dough wrapped in wax paper in the refrigerator until you're ready to work with it, so it doesn't get too soft or sticky.


Place the piece of dough between two sheets of wax paper, and roll out to about 1/8-inch to 1/4-inch thickness.


If the dough is sticky, sprinkle lightly with some gluten-free flour.


Using a wide juice glass, press the top of the glass into the flattened dough to cut out circles of dough (about 3-inches wide).  Move the dough circles to a baking sheet lined with parchment paper.  Gather the scraps and re-roll the dough to make more circles, until you are finished with that bit of dough.


 These are the fillings I used:


Place about a teaspoon of filling in the center of each circle.


Fold up the sides of the circle to create a triangle.  Make sure to leave an opening at the center so that you can still see the filling!  Pinch the corners together to make sure the filling doesn't leak out.


Bake at 350°F for 15-20 minutes, or until the edges are golden brown.


Let the hamantaschen cool for 5 minutes on the baking sheet.


Transfer the cookies to cool on a wire rack.  That's it!  Beautiful, delicious hamantaschen!


Gluten-Free, Pareve (Dairy-Free) Hamantaschen
(Adapted from Gluten-Free Nosh)

Ingredients:
  • 4 1/2 cups gluten-free flour (I used: 1-1/2 cups brown rice flour, 1 cup potato starch, 1 cup tapioca flour/starch, 3/4 cup sorghum flour, 1/4 cup white rice flour)
  • 2 teaspoons baking powder
  • 2 teaspoons xanthan gum
  • 1/2 teaspoon salt
  • 3 eggs
  • 1 cup sugar
  • 1/2 cup canola oil
  • 1 tablespoon lemon juice
  • 1 teaspoon vanilla extract
  • Fillings (options include chocolate chips, jams/preserves, peanut butter, etc.)
Directions:
  1. In medium bowl, combine gluten-free flours, baking powder, xanthan gum and salt. Whisk to combine and set aside.
  2. In mixer, beat eggs on high for 1 minute until thick. Add sugar and beat for 1 more minute.
  3. Add oil, lemon juice, and vanilla extract and beat until combined.
  4. Add flour combination slowly to mixture. Mix until well combined and dough begins to gather together (dough may not be stiff enough to form a ball).
  5. Remove dough from bowl, wrap in waxed paper and then plastic wrap and refrigerate overnight. The dough can be stored in refrigerator for a few days before baking.
  6. When you’re ready to bake the hamantaschen, preheat the oven to 350°F.
  7. Work with a quarter of the dough at a time, leaving the remainder refrigerated until needed, so it doesn’t get too soft or sticky. Place the dough between two sheets of waxed paper, and roll out with a rolling pin to about 1/8-inch to 1/4-inch thickness. If the dough is sticky, sprinkle some gluten-free flour on the work surface and knead it into the dough.
  8. Using a wide juice glass, press the top of the glass into the dough to cut out 3-inch circles of dough. Gather scraps and reroll for more circles. Move dough circles to baking sheets lined with parchment paper.
  9. Put approximately 1 teaspoon of filling in the center of each circle. Fold up the sides of the circle to form a triangle. Leave an opening at center of the triangle so you can see the filling. Pinch the corners together to prevent filling from leaking out.
  10. Bake at 350°F for 15 to 20 minutes or until edges are slightly brown. Let cool for 5 minutes on the baking sheet before transferring to a wire cooling rack.
Yield: About 18 to 24 hamantaschen

Hamantaschen Purim Nails

Purim is a holiday when people dress up in funny costumes and everything's sort of topsy-turvy (for more information about Purim, read this article).  Hamantaschen are a traditional triangular cookie filled with jelly, poppy seeds, chocolate chips, or some other sweet filling.  Combining my love for baking (the post with gluten-free hamantaschen will be up sometime later this week) and my nail designs, I created this whimsical hamantaschen design.  Enjoy!


These are the colors I used:


This design begins with a base coat, and then 2 coats of pink nail polish.


Then, take a blue striper and draw 4 vertical lines on each nail.


Using a medium-large dotting tool or a small paintbrush, draw gold triangles on each nail.  I made them at different orientations so they're all different.


Use a dark red nail polish to make a smaller triangle (using a small dotting tool or a paintbrush) within each gold triangle.


Apply a top coat and you're done!