Tuesday, February 28, 2012

Dr. Seuss Nails

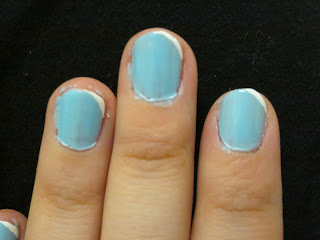
When I was in elementary school, we used to participate in Read Across America Day on Dr. Seuss's birthday (March 2).  The whole school would come together in the gym, and we'd all sit on the floor with a book we chose and read to ourselves.  The goal was to increase reading among children, but it was always fun to see people dressed up like the Cat in the Hat.  This week's nail design is in memory of Dr. Seuss!


These are the colors I used:


Start off with a base coat, and then apply two layers of light blue polish.


Across the top right corner of each nail, draw a thin white stripe.


Adjacent to the white stripe, draw a thin red stripe.


On each ring finger, make 3 small red rectangles, one on top of the other, leaving space in between each.


In the spaces between the rectangles, draw 2 white rectangles.  Below the bottom red rectangle, draw a white line that's wider than the stack of rectangles (to be the brim of the hat).


Outline the hat with thin black lines.


Apply a top coat, and you're done!  Mine smudged a little, but it adds to the effect since Dr. Seuss's lines were never exact.


Happy Read Across America Day!

Monday, February 27, 2012

Chocolate- and White Chocolate-Covered Strawberries

Chocolate-covered strawberries are fun to eat and decorate (and they're so sweet and delicious that they always run out quickly).  I made these for my boyfriend's grandmother's birthday party this past weekend, and received lots of compliments!  An important consideration is that time is of the essence when working with melted chocolate, since you want to make sure you use the chocolate before it cools too much.


Ingredients:

2 pints fresh strawberries
1 12-ounce bag white chocolate chips
1 12-ounce bag semisweet chocolate chips
Toppings (I used rainbow sprinkles, mini M&M's®, chocolate sprinkles, and other sprinkles I found in my kitchen)


1. Line 2 baking sheet with waxed paper (the waxed paper makes sure you'll be able to remove the strawberries later).


2. Wash and dry all strawberries (dry them gently with paper towels - if they're wet, the chocolate won't stick).


3. Decide which topping you'll use first, and pour some into a bowl.


4. Pour about 3/4 cup white chocolate chips into a microwave-safe bowl.


5. Microwave on high for 1 minute.  Stir.  Do not put back into the microwave, even if some pieces are not completely melted.


6. Holding a strawberry carefully by the leaves, dip and roll the bottom 3/4 of the strawberry into the white chocolate.  


7. Dip the strawberry into the topping of your choice, and place it on the baking sheet.


8. Repeat this until the melted white chocolate is gone.


9. When heating more white chocolate chips, either use a new (clean) bowl or wash the bowl out completely before adding the chips.  Any white chocolate that is reheated will make the whole batch not work.


10. Repeat this for half of the strawberries, changing up which toppings you use.


11. In a clean bowl, microwave 3/4 cup semisweet chocolate chips for 1 minute.  Stir.  If not completely melted, microwave again for 10 seconds.  Stir.


12. Repeat process of dipping strawberry in chocolate and then in toppings, placing carefully on the baking sheet.


13. To create drizzled chocolate lines (white on semisweet or semisweet on white), dip spoon into melted chocolate.  Carefully drag dripping end of chocolate over strawberry, dipping the spoon in the melted chocolate between each line application.


14. Once all the strawberries are covered, place baking trays in refrigerator, and refrigerate for at least 2 hours.


15. Enjoy!

Banana Cupcakes with Pareve (Non-Dairy) Chocolate Buttercream Frosting

This was my first adventure with gluten-free cupcakes, and I have to say it was a success!  Even my friends who eat gluten said they were delicious, so it's definitely a recipe I'll try again.  They weren't overly banana-y, so I might try adding a banana next time and see how that turns out.  The full recipe appears at the bottom of this post.  Happy baking!


Preheat the oven to 350°F (177°C).  Line 18 muffin cups with paper baking cups.

Combine flour blend, granulated sugar, brown sugar, baking powder, xanthan gum, salt, cinnamon, and pumpkin pie spice (or allspice) in a large bowl.


Add oil, eggs, soy milk, and vanilla; beat with electric mixer at medium speed for 2 minutes or until well-blended.


Beat in bananas until well-blended.


Spoon batter into prepared muffin cups, filling each 3/4 full.


Bake 25-30 minutes or until toothpick inserted into the centers comes out clean.


  Cool cupcakes in pans on wire racks 10 minutes.


Remove to wire racks and cool completely.


Pareve (Non-Dairy) Chocolate Buttercream Frosting


Beat 1/2 cup (1 stick) non-dairy margarine (not spread) with an electric mixer at medium speed until it's light and fluffy.  Add 2 teaspoons vanilla.  Gradually beat in 1/2 cup unsweetened cocoa powder and 3 1/2 cups powdered sugar (1/2 cup at a time, so you're adding a 1/2 cup 7 times, beating between each 1/2 cup).  Add 4-6 tablespoons vanilla soy milk 1 tablespoon at a time until the frosting is spreadable.


Frost the cupcakes once they're completely cool.


That's it - beautiful and delicious cupcakes!


Banana Cupcakes with Pareve (Non-Dairy) Chocolate Buttercream Frosting
(Adapted from Recipes for Gluten-Free Kids: Fun Eats from Breakfast to Treats!)


Ingredients:

2 cups gluten-free all-purpose flour (I used King Arthur Flour Gluten-Free Multi Purpose Flour)
1 1/2 cups granulated sugar
2 tablespoons packed light brown sugar
2 teaspoons baking powder
3/4 teaspoon xanthan gum
1/2 teaspoon salt
1/4 teaspoon ground cinnamon
1/4 teaspoon pumpkin pie spice (alternatively, you can use 1/2 teaspoon cinnamon and 1/4 teaspoon allspice)
1/2 cup vegetable or canola oil
2 eggs
1/4 cup vanilla (or plain) soy milk (I like vanilla because it's sweeter)
1 teaspoon vanilla
2 mashed bananas


Pareve (Non-Dairy) Chocolate Buttercream Frosting


1/2 cup (1 stick) non-dairy margarine, cut into 4 pieces.
2 teaspoons vanilla
1/2 cup unsweetened cocoa powder
3 1/2 cups confectioner's sugar
4-6 tablespoons vanilla (or plain) soy milk


Directions:


1. Preheat oven to 350°F (177°C).


2. Line 18 standard (2 1/2-inch) muffin cups with paper baking cups.


3. Combine flour, granulated sugar, brown sugar, baking powder, xanthan gum, salt, cinnamon, and pumpkin pie spice (or allspice) in a large bowl.


4. Add oil, eggs, soy milk, and vanilla.  Beat with electric mixer at medium speed for 2 minutes or until well-blended.


5. Beat in bananas until well-blended.


6. Spoon batter into prepared muffin cups, filling each cup 3/4 of the way full.


7. Bake 25-30 minutes or until toothpick inserted into centers of cupcakes comes out clean.


8. Cool cupcakes in pans on wire racks for 10 minutes.  Remove to wire racks and cool completely.


9. In a medium bowl, beat margarine with electric mixer at medium speed until light and fluffy.


10. Add vanilla, and beat until well-integrated.


11. Gradually beat in cocoa powder.


12. Gradually beat in confectioner's sugar, adding 1/2 cup at a time.


13. Add 4-6 tablespoons soy milk, 1 at a time, until the frosting is spreadable.


14. Frost cupcakes using a knife or a small rubber spatula.


15. Enjoy!

Wednesday, February 22, 2012

Heart nails

When I sat down to do my nails this week, I wasn't sure what I wanted to do.  This one just came to me, and even though it's after Valentine's Day, it's still cute.  Or at least I think so.


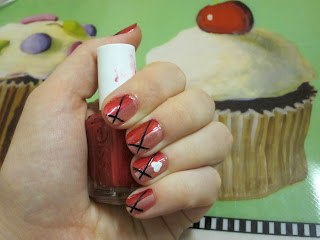
To create this design, start with a base coat.  Apply two coats of a pink/coral nail polish, but any lighter pink would work.  Then use a medium brush with red nail polish to paint half of each nail red.  Using a very thin brush with black nail polish (the striper kinds work well), draw a line diagonally across each nail, from the bottom of one side to the top of the other.  Once that has dried somewhat, draw a smaller black line going diagonally in the opposite direction towards the top of each nail.  Once everything is dry, use white nail polish and a dotting tool (or the back of a paintbrush, or some other object that can make small dots), draw two medium dots next to each other.  I did it only on my ring fingers, but you can choose to do it on all of them or on a different finger.  While the dots are still wet, make a smaller dot below and in between them.  Use a toothpick or the small dotting tool to connect the dots and draw the heart.  Once everything is really dry (you may have to wait a while so the heart and lines don't smudge), add a top coat and you're done!


Tuesday, February 21, 2012

First post/overview of past nail designs

First blog post!  I'll start today with a montage of past nail designs before I really get into new designs and baking endeavors.

4th of July 

For this design, start by applying a base coat.  I use a base/top coat, but using separate ones usually creates a glossier finish.  Next, apply two layers of white nail polish.  Once the white has dried, use a thick brush to create a blue box in the top left corner of each nail.  Take a thin red striper to create red horizontal lines, and then use a thin white brush (or a toothpick or dotting tool) to create white dots/stars in the blue box.  Once it's all dry, put a top coat over it all.  And that's it!

Rubber Ducky 

Start with a base coat, and then two layers of a light blue nail polish.  I put the duck on my ring finger, but you can put it on whichever finger you'd like.  Use a dotting tool (or the back end of a paintbrush) to put a large dot of yellow nail polish in the middle of your nail.  Put another large dot of yellow directly underneath the first dot (touching it, like you would draw a snowman).  Use a toothpick or a smaller dotting tool to make a small yellow dot about a centimeter to the left of the two larger dots.  Use the toothpick or dotting tool to drag some of the nail polish from the lower large dot to connect it to the smaller one, and then fill it in to create a duck shape.  Use a toothpick and orange nail polish to make a small line for the beak, and then make a black dot for the duck's eye.  Use a toothpick and white nail polish to make a smaller dot on top of the black dot.  To make the bubbles, take a paper plate or other surface to make bubbles of white, light blue, and shiny medium blue nail polish.  Take a dotting tool and dip it into each of the colors, and then make a dot underneath the duck.  Make a bunch of bubbles underneath the duck.  Repeat that for bubbles on all your nails, and you can use different sizes of dotting tools to make different bubbles.  Each bubble will be unique!  Top it off with a top coat, and you're done!

White Argyle 

Start with a base coat, and then two coats of white polish.  Use a light blue nail polish with a medium brush to create a diagonal stripe on each nail.  In the opposite direction, use a dark pink nail polish with a thin brush to create a diagonal stripe.  On either side of that stripe, draw a thin pink stripe.  Finally, use a very thin black brush to create stripes on either side and in the middle of the blue stripe.  Finish it off with a top coat!

Red Argyle 

This one's the same as the white argyle design, but with different colors.  Feel free to use whatever colors you want!

Barnard Spirit Day 

I did this design for Barnard Spirit Day.  I started with a base coat, and then applied two layers of a shiny light blue.  I wrote the letters with a medium blue, and then put a top coat over it all.  You can write anything that will fit on 10 fingers!

Fun Lines

As with the other designs, start with a base coat.  Then apply two coats of dark pink nail polish to each nail.  Use a blue polish to pain half of each nail, and then wait for them to dry.  Take a thin brush and draw a light pink stripe vertically down the center of the blue part of each nail.  Draw a horizontal line with a light blue polish in the middle of the bottom half of each nail.  Using a blue polish, draw a thin brush diagonally across each nail.  Use a green polish to draw a thin diagonal line in the opposite direction of the blue one.  Once everything is really dry (if it's wet, it will smudge), apply a top coat.  You're done!